Avoiding CPU Speed Scaling – Running CPU At Full Speed
If you have a server on collocation with the super-fast CPU, that doesn't mean that you get it running at full power.
Here is a preamble. When doing inventory of Linux servers, that I'm administering, I've found that some of them are running on lower CPU speed, then they could. This can be easily checked with this command:
#grep -E '^model name|^cpu MHz' /proc/cpuinfo
What you can see:
model name : Intel(R) Core(TM) i7 CPU 920 @ 2.67GHz
cpu MHz : 1600.000
...
or
model name : Intel(R) Core(TM)2 CPU 6600 @ 2.40GHz
cpu MHz : 1596.000
...
or even
model name : Intel(R) Core(TM)2 CPU 4400 @ 2.00GHz
cpu MHz : 1000.000
model name : Intel(R) Core(TM)2 CPU 4400 @ 2.00GHz
cpu MHz : 600.000
Oops, we are paying for 2 Core 2Ghz CPU that runs on 600Mhz on one core and 1000Mhz on another!!!
There will be other lines for all the CPUs/cores/threads, probably with the same values.
This feature is nice, if we are running workstation, but what I've noticed, we do have the same CPU throttling on Ubuntu Server 10.04 builds and on CentOS 5.3, 5.4 and 5.5 builds (thus on RedHat too).
After hours of digging google, I've found that:
- this problem is very common
- there are several bug reports about this issue
- this is not BIOS settings problem, because on dual boot systems, CPU runs at full speed on Windows
- there are no 100% working solutions or they are too difficult to find
- this is not a bug, but a 'feature' of the new kernels, it is implemented differently on 2.6.18 (CentOS) and 2.6.32 (Ubuntu).
Here is a tip how to disable it on running system:
1) Check that 'kondemand' thread is running, run as root: "pgrep -lf ondemand"
the output should be like:
# uname -a
Linux boston07 2.6.18-164.6.1.el5 #1 SMP Tue Nov 3 16:18:27 EST 2009 i686 i686 i386 GNU/Linux
# pgrep -lf ondemand
1444 kondemand/0
1445 kondemand/1
2) Check that current cpu speed differs from the maximum:
# grep -E '^model name|^cpu MHz' /proc/cpuinfo
model name : Intel(R) Core(TM)2 CPU 6600 @ 2.40GHz
cpu MHz : 1596.000
model name : Intel(R) Core(TM)2 CPU 6600 @ 2.40GHz
cpu MHz : 1596.000
3) Change CPU governor from 'ondemand' to 'performance' for all CPUs/cores, run as root:
for CPUFREQ in /sys/devices/system/cpu/cpu*/cpufreq/scaling_governor; do [ -f $CPUFREQ ] || continue; echo -n performance > $CPUFREQ; done
4) Check that your changes have been applied:
# grep -E '^model name|^cpu MHz' /proc/cpuinfo
model name : Intel(R) Core(TM)2 CPU 6600 @ 2.40GHz
cpu MHz : 2394.000
model name : Intel(R) Core(TM)2 CPU 6600 @ 2.40GHz
cpu MHz : 2394.000
5) If you are running 'cpuspeed', 'cpufreqd', 'powerd' or other daemons, that can control CPU stepping, just stop them, if you really need to run your system on 100% of the CPU speed.
On CentOS:
# service cpuspeed stop
6) On Linux 2.6.32 (On RedHat 6, and Oracle Unbreakable Linux 6) remove CPU scaling kernel modules:
# lsmod | grep ondemand
cpufreq_ondemand 8764 0
freq_table 3751 2 cpufreq_ondemand,acpi_cpufreq
# rmmod cpufreq_ondemand acpi_cpufreq freq_table
Ensure that no 'kondemand' kernel threads are running:
# pgrep -lf kondemand
#
7) To make changes permanent (on reboot):
- On Ubuntu, modify /etc/init.d/ondemand script:
change this
echo -n ondemand > $CPUFREQ
to this:
echo -n performance > $CPUFREQ
OR ALTERNATIVELY just remove all references to ondemand from /etc/rc?.d/
rm -f /etc/rc?.d/S99ondemand
- On CentOS, just create a new script /etc/init.d/ondemand:
#! /bin/bash
#
# ondemand sets cpu govermor
#
# chkconfig: 2345 10 90
#
# description: Set the CPU Frequency Scaling governor to "performance"
#
### BEGIN INIT INFO
# Provides: $ondemand
### END INIT INFO
PATH=/sbin:/usr/sbin:/bin:/usr/bin
case "$1" in
start)
for CPUFREQ in /sys/devices/system/cpu/cpu*/cpufreq/scaling_governor
do
[ -f $CPUFREQ ] || continue
echo -n performance > $CPUFREQ
done
;;
restart|reload|force-reload)
echo "Error: argument '$1' not supported" >&2
exit 3
;;
stop)
;;
*)
echo "Usage: $0 start|stop" >&2
exit 3
;;
esac
then enable it:
chmod +x /etc/init.d/ondemand
chkconfig --add ondemand
service ondemand restart
I'm using 'ondemand' name of the script, this may be a little bit misleading (because really it is a 'performance'), but you may change it.
Reference here: http://www.servernoobs.com/avoiding-cpu-speed-scaling-in-modern-linux-distributions-running-cpu-at-full-speed-tips/?doing_wp_cron=1390110978.2860989570617675781250#
Setup Split tunneling when using OpenVPN
I recently wrote about configuring OpenVPN with PrivateInternetAcess VPN on my home server. During this process, I noticed that I was not able to SSH into the machine, or reach any of the other services I provide from outside my network, or across my WAN connection. What I discovered was that whenever OpenVPN makes its connection, it become the default gateway for all your outbound connections. This becomes a problem when you need to reach the machine from outside of you networks, as any responses sent by your server will ultimately end up going across the VPN as its gateway.
Luckily, Linux is pretty powerful when it comes to networking! We can setup our own routes, and give it rules to follow. What I did was create a route that will return any packets coming from my WAN back out across my WAN, instead of going to the VPN. The cool thing is that all my other packets outbound will go across the VPN which is what I want them to do for safety. MY Bittorrent traffic still goes out my VPN connection.
I followed the guide here to setup routes: http://lartc.org/howto/lartc.rpdb.multiple-links.html The problem is that whenever you use the ip command to create routes, they do not persist across a reboot! So, I used the commands to quickly create my desired routes, and then test them. After setting it all up, I confirmed it was working like I wanted, so my next step was to keep these routes across reboots. Red Hat and CentOS uses script files to setup and tear down routes when it initializes the network. The thing to keep in mind when you create these scripts is that it essentially just runs the "ip route" command and then appends whatever you put in the script.
First, you need to create your route script. It will need to be housed in the /etc/sysconfig/network-scripts directory and it should start with the name of route-eth0. Below is a snippet of my /etc/sysconfig/network-scripts/route-bond0 file (I am using bonded nics, hence the bond0. If you just have one nic this would be eth0).
192.168.1.0/24 dev bond0 src 192.168.1.2 table novpn
default via 192.168.1.1 table novpn
192.168.1.0/24 dev eth0 src 192.168.1.2
Then you need to create a rules script in the same /etc/sysconfig/network-scripts directory. It's name should being with rule-eth0. Below is a snippet of what I have in my /etc/sysconfig/network-scripts/rule-bond0:
from 192.168.1.2 table novpn
In both my examples above, I am using a bonded nic pair which is named bond0. The IP address of my server is 192.168.1.2, and its on the network 192.168.1.0 with a /24. My gateway is at 192.168.1.1.
Once you have those two files created you will need to restart your networking, by running the command:
sudo service network restart
Feel free to download the files I have created and modify them to fit your needs. Here is a link to download them: http://www.gigahype.com/wp-content/uploads/2014/01/route_and_rules.tar
sudo wget http://www.gigahype.com/wp-content/uploads/2014/01/route_and_rules.tar
That's it! You now have split tunneling that will let all of your server traffic go outbound on your VPN adapter (tun0). Once there is a request coming from your WAN, the server will reply to that request out the normal gateway to your router and ISP.
Configure OpenVPN on CentOS using PrivateInternetAccess
I recently decided to start protecting myself against the evil spying of the US Government as well as all of the DMCA hounds that are crawling the internet. I have known about VPN's for quite some time, but I honestly never thought about using one. With all the leaks that Edward Snowden has been publishing, it got me thinking about my own online privacy, and how to best protect myself.
A trusted friend of mine has been using a VPN for several months now, and he gave me a really great recommendation on a VPN provider. PrivateInternetAccess.com is what he recommended to me, and it was a superb choice. Here is their webpage if you would like to check them out: https://www.privateinternetaccess.com/ They offer a really great and really fast VPN service for about $40 per year (at the time of this writing). They also accept Bitcoin as a payment method, which is great for remaining anonymous. Another reason to choose PIA (as they are often times referred to) is because they offer several egress point all over the Globe. Their service is fast as well. I am routinely seeing 20 to 30 meg speeds when using the US East coast egress points.
Here is a Speedtest.net graph to show a recent test:

Now, let's get started on getting this setup. I will provide step-by-step instructions below, and even provide some pre-built OpenVPN configuration files to make it even easier.
First you will need to signup with PrivateInternetAccess. Follow this link to signup and create your account: https://www.privateinternetaccess.com/pages/buy-vpn/ Once you get setup, they will email you with your credentials to use for the service. DON'T LOOSE THESE!
Then, you will need to perform the following to get CentOS or RHEL setup for the service.
-
Install OpenVPN on your machine. I am using CentOS 6.5 64 bit, but the instructions will be similar on other distros.
sudo yum install openvpn
-
Create a password file that contains your PIA credentials so that OpenVPN can use them to connect. These credentials are the ones the PIA emails to you. This will keep OpenVPN from prompting you for your VPN password when it connects. Set the permissions to 400 and give ownership to root.
echo "YOUR PIA USERNAME" > ~/.pia
echo "YOUR PIA PASSWORD" >> ~/.pia
sudo chown root:root ~/.pia && sudo chmod 400 ~/.pia
sudo mv ~/.pia /root/
-
Download the PIA configuration files. I have created the OpenVPN configuration files that will work with PIA already and included them in the command below. These config files are setup for all locations that PIA is currently offering, and I will do my best to keep them up to date.
wget http://www.gigahype.com/wp-content/uploads/2014/01/openvpn_configs.tar
-
Untar the config files and move them to the proper OpenVPN directory.
tar –xvf openvpn_configs.tar
sudo mv openvpn /etc/
-
Now, we need to create a server.conf file so that OpenVPN will know which of our PIA configs to look to. We do this by creating a symlink to whichever PIA config file we want to use. It's important to note that each of the PIA config files are designed for a certain region. This allows you to pick your egress point by country, state, or larger region. We will do an ls to list the files in the directory so you may choose whichever region you want to use.
cd /etc/openvpn
ls –l
(You can now see all of the regions that I have configured. Pick which one you want to use for the next step)
sudo ln -s /etc/openvpn/PICKYOURS.ovpn /etc/openvpn/server.conf
-
If you use Google DNS, OpenDNS, or even your ISP's DNS servers you expose yourself to DNS Leakage. DNS leakage occurs because the DNS providers are able to keep a record of all the sites that your computer requests IP's for. I highly recommend you google search the term "DNS Leakage" to get a better idea of it. If you want to mitigate DNS Leakage, PIA provides secure and private DNS servers. This step is totally optional, but I highly recommend doing this if you want to increase your security and anonymity. PIA's DNS servers are: 209.222.18.222 and 209.222.18.218 I will outline outline how to modify your DNS servers below:
sudo cp /etc/resolv.conf ~/resolv.conf.backup
sudo echo "nameserver 209.222.18.222" > /etc/resolv.conf
sudo echo "nameserver 209.222.18.218" >> /etc/resolv.conf
-
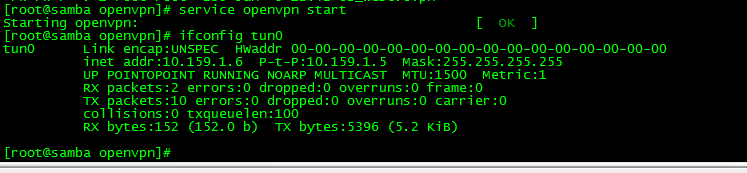
Now we will start the OpenVPN service and then make sure it is connecting to PIA and creating the proper VPN network adapter tun0
sudo service openvpn start
ifconfig tun0
(the ifconfig tun0 command should return the information about the VPN network. It will look something similar to the picture below)
-
If you would like to have OpenVPN always start at boot, you can do the following command. This is an optional step.
sudo chkconfig openvpn on
That's it! If everything went well, you know have OpenVPN fully configured on a headless CentOS machine and have set it up to connect automatically at boot. You can always double check to make sure it is working by looking for the tun0 adapter. If you have access to launch a web browser on the machine, you can point it to www.ipchicken.com and it will show you the external IP address you connected from. If you are going through the VPN adapter, it will be a different IP address than your ISP.
Please see my post on how to configure Transmission Bittorrent client to always send its traffic through the VPN connection to avoid being snooped on. You can find it here: