Add disk back into a Linux MDADM software raid
I have a finicky disk on my home server that always drops from its RAID5 sofware raid. The good thing for me is this RAID is one I use for low importance, bulk data, like OS ISO's and other stuff I can easily re-download if needed. If you have a disk that keeps dropping from your RAID, I would recommend replacing the disk with one that is not so grumpy, and/or making sure you backups are in good shape.
However, I find that every now and then, usually after a reboot, this grumpy disk will eject itself from my RAID, so I have to re-insert it, and rebuild my array. Here is my "cookbook recipe" that I use to get it back. This post was mostly written for me, since I usually forget what commands I use, so I figured I would dump there for everyone else as well. Lest get started:
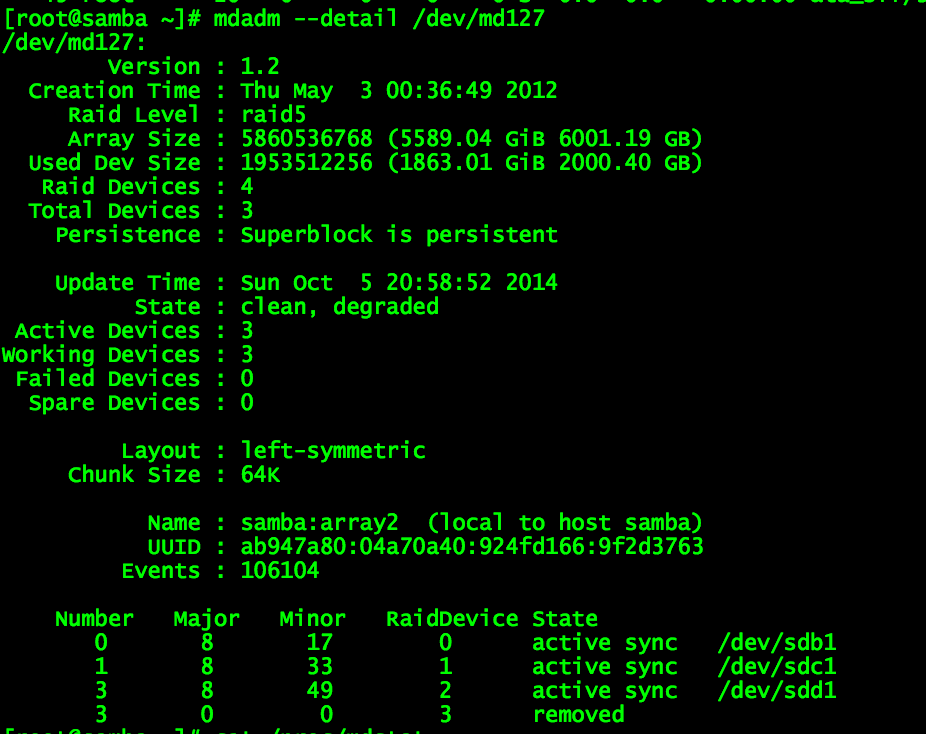
First, I need to find out which disk ejected, so run the mdadm command to get the details:
mdadm --detail /dev/md127
You might see something that looks like this:
I then use fdisk to find the disk that went missing:
fdisk -cul
Now that I have found my disk, I can reinsert it into the array and let the rebuild begin:
mdadm --manage /dev/md127 --add /dev/sde1
The disk should be added back to the array, and should now be rebuilding. You can check the status of the rebuild a few different ways. The way I prefer is by watching /proc/mdstat. This command works great:
watch cat /proc/mdstat
You can also get the details by running:
mdadm --detail /dev/md127
There are a couple of ways you can speed up the rebuild process a few different ways. Be sure to check my post on speeding up the rebuild here: Helpful tips to speed up a linux software RAID rebuild
Setup Split tunneling when using OpenVPN
I recently wrote about configuring OpenVPN with PrivateInternetAcess VPN on my home server. During this process, I noticed that I was not able to SSH into the machine, or reach any of the other services I provide from outside my network, or across my WAN connection. What I discovered was that whenever OpenVPN makes its connection, it become the default gateway for all your outbound connections. This becomes a problem when you need to reach the machine from outside of you networks, as any responses sent by your server will ultimately end up going across the VPN as its gateway.
Luckily, Linux is pretty powerful when it comes to networking! We can setup our own routes, and give it rules to follow. What I did was create a route that will return any packets coming from my WAN back out across my WAN, instead of going to the VPN. The cool thing is that all my other packets outbound will go across the VPN which is what I want them to do for safety. MY Bittorrent traffic still goes out my VPN connection.
I followed the guide here to setup routes: http://lartc.org/howto/lartc.rpdb.multiple-links.html The problem is that whenever you use the ip command to create routes, they do not persist across a reboot! So, I used the commands to quickly create my desired routes, and then test them. After setting it all up, I confirmed it was working like I wanted, so my next step was to keep these routes across reboots. Red Hat and CentOS uses script files to setup and tear down routes when it initializes the network. The thing to keep in mind when you create these scripts is that it essentially just runs the "ip route" command and then appends whatever you put in the script.
First, you need to create your route script. It will need to be housed in the /etc/sysconfig/network-scripts directory and it should start with the name of route-eth0. Below is a snippet of my /etc/sysconfig/network-scripts/route-bond0 file (I am using bonded nics, hence the bond0. If you just have one nic this would be eth0).
192.168.1.0/24 dev bond0 src 192.168.1.2 table novpn
default via 192.168.1.1 table novpn
192.168.1.0/24 dev eth0 src 192.168.1.2
Then you need to create a rules script in the same /etc/sysconfig/network-scripts directory. It's name should being with rule-eth0. Below is a snippet of what I have in my /etc/sysconfig/network-scripts/rule-bond0:
from 192.168.1.2 table novpn
In both my examples above, I am using a bonded nic pair which is named bond0. The IP address of my server is 192.168.1.2, and its on the network 192.168.1.0 with a /24. My gateway is at 192.168.1.1.
Once you have those two files created you will need to restart your networking, by running the command:
sudo service network restart
Feel free to download the files I have created and modify them to fit your needs. Here is a link to download them: http://www.gigahype.com/wp-content/uploads/2014/01/route_and_rules.tar
sudo wget http://www.gigahype.com/wp-content/uploads/2014/01/route_and_rules.tar
That's it! You now have split tunneling that will let all of your server traffic go outbound on your VPN adapter (tun0). Once there is a request coming from your WAN, the server will reply to that request out the normal gateway to your router and ISP.
Configure OpenVPN on CentOS using PrivateInternetAccess
I recently decided to start protecting myself against the evil spying of the US Government as well as all of the DMCA hounds that are crawling the internet. I have known about VPN's for quite some time, but I honestly never thought about using one. With all the leaks that Edward Snowden has been publishing, it got me thinking about my own online privacy, and how to best protect myself.
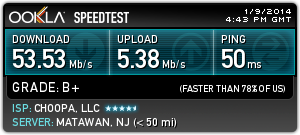
A trusted friend of mine has been using a VPN for several months now, and he gave me a really great recommendation on a VPN provider. PrivateInternetAccess.com is what he recommended to me, and it was a superb choice. Here is their webpage if you would like to check them out: https://www.privateinternetaccess.com/ They offer a really great and really fast VPN service for about $40 per year (at the time of this writing). They also accept Bitcoin as a payment method, which is great for remaining anonymous. Another reason to choose PIA (as they are often times referred to) is because they offer several egress point all over the Globe. Their service is fast as well. I am routinely seeing 20 to 30 meg speeds when using the US East coast egress points.
Here is a Speedtest.net graph to show a recent test:
Now, let's get started on getting this setup. I will provide step-by-step instructions below, and even provide some pre-built OpenVPN configuration files to make it even easier.
First you will need to signup with PrivateInternetAccess. Follow this link to signup and create your account: https://www.privateinternetaccess.com/pages/buy-vpn/ Once you get setup, they will email you with your credentials to use for the service. DON'T LOOSE THESE!
Then, you will need to perform the following to get CentOS or RHEL setup for the service.
-
Install OpenVPN on your machine. I am using CentOS 6.5 64 bit, but the instructions will be similar on other distros.
sudo yum install openvpn
-
Create a password file that contains your PIA credentials so that OpenVPN can use them to connect. These credentials are the ones the PIA emails to you. This will keep OpenVPN from prompting you for your VPN password when it connects. Set the permissions to 400 and give ownership to root.
echo "YOUR PIA USERNAME" > ~/.pia
echo "YOUR PIA PASSWORD" >> ~/.pia
sudo chown root:root ~/.pia && sudo chmod 400 ~/.pia
sudo mv ~/.pia /root/
-
Download the PIA configuration files. I have created the OpenVPN configuration files that will work with PIA already and included them in the command below. These config files are setup for all locations that PIA is currently offering, and I will do my best to keep them up to date.
wget http://www.gigahype.com/wp-content/uploads/2014/01/openvpn_configs.tar
-
Untar the config files and move them to the proper OpenVPN directory.
tar –xvf openvpn_configs.tar
sudo mv openvpn /etc/
-
Now, we need to create a server.conf file so that OpenVPN will know which of our PIA configs to look to. We do this by creating a symlink to whichever PIA config file we want to use. It's important to note that each of the PIA config files are designed for a certain region. This allows you to pick your egress point by country, state, or larger region. We will do an ls to list the files in the directory so you may choose whichever region you want to use.
cd /etc/openvpn
ls –l
(You can now see all of the regions that I have configured. Pick which one you want to use for the next step)
sudo ln -s /etc/openvpn/PICKYOURS.ovpn /etc/openvpn/server.conf
-
If you use Google DNS, OpenDNS, or even your ISP's DNS servers you expose yourself to DNS Leakage. DNS leakage occurs because the DNS providers are able to keep a record of all the sites that your computer requests IP's for. I highly recommend you google search the term "DNS Leakage" to get a better idea of it. If you want to mitigate DNS Leakage, PIA provides secure and private DNS servers. This step is totally optional, but I highly recommend doing this if you want to increase your security and anonymity. PIA's DNS servers are: 209.222.18.222 and 209.222.18.218 I will outline outline how to modify your DNS servers below:
sudo cp /etc/resolv.conf ~/resolv.conf.backup
sudo echo "nameserver 209.222.18.222" > /etc/resolv.conf
sudo echo "nameserver 209.222.18.218" >> /etc/resolv.conf
-
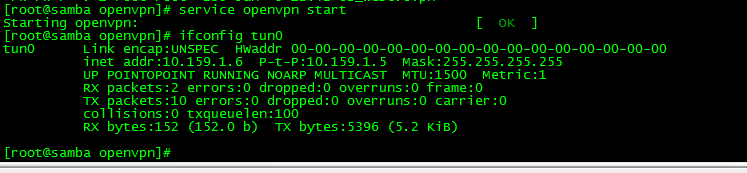
Now we will start the OpenVPN service and then make sure it is connecting to PIA and creating the proper VPN network adapter tun0
sudo service openvpn start
ifconfig tun0
(the ifconfig tun0 command should return the information about the VPN network. It will look something similar to the picture below)
-
If you would like to have OpenVPN always start at boot, you can do the following command. This is an optional step.
sudo chkconfig openvpn on
That's it! If everything went well, you know have OpenVPN fully configured on a headless CentOS machine and have set it up to connect automatically at boot. You can always double check to make sure it is working by looking for the tun0 adapter. If you have access to launch a web browser on the machine, you can point it to www.ipchicken.com and it will show you the external IP address you connected from. If you are going through the VPN adapter, it will be a different IP address than your ISP.
Please see my post on how to configure Transmission Bittorrent client to always send its traffic through the VPN connection to avoid being snooped on. You can find it here:
Stop virt-manager from prompting for password
On a RHEL5, RHEL6 and any other RHEL variant, you might run into the annoying password prompt when you try to run virt-manager as a normal user. Normally, you will see this prompt pop up when you are logged into the Desktop Environment as a normal user, and then try to launch virt-manager from your "Applications --> System Tools" menu, or you might even see it when you run virt-manager from the shell as a normal user.
This is done for good reason, system security. But, when you are the primary workstation user, and you use Virtual Machines on a daily basis, you are like me and probably getting annoyed by entering your sudo or root password when you launch the virt-manager. HAVE NO FEAR! There is a perfectly acceptable way of managing this. We are going to take advantage of PolicyKit to manage what the normal user can run. In this case, we are going to create a policy that allows any user that is a member of the "virtman" group the ability to launch virt-manager without being prompted for authentication. This makes is easy to give this ability to other users of the machine by simply adding them to the virtman group that we will create.
Here we go. Follow these steps to get it setup:
1. Create the virtman group on your machine. You can do this however your comfortable, or you can simply use the command below: (Notice we made the group a system group for cleanliness)
sudo groupadd -r virtman
2. Add whatever users you want to this system group: (in this example we are adding the user JohnDoe to the group virtman)
sudo usermod -a -G virtman JohnDoe
3. Now, we need to create our PolicyKit policy that will allow the users of virtman to run virt-manager. You can do this in a number of ways. The contents of the file will need to include the following:
[Allow group virtman libvirt management permissions]
Identity=unix-group:virtman
Action=org.libvirt.unix.manage
ResultAny=yes
ResultInactive=yes
ResultActive=yes
Paste the above lines into a newly created file at this path: /etc/polkit-1/localauthority/50-local.d/50-org.virtman-libvirt-local-access.pkla
You can use which ever editor you prefer, just so long as you place the file in the path I noted above, and that it has the contents as described.
But, if your like me, feel free to wget a copy of the file that I have hosted on this server. You can grab the file, and place it in the right directory using this command:
sudo wget -P /etc/polkit-1/localauthority/50-local.d/50-org.virtman-libvirt-local-access.pkla http://www.gigahype.com/wp-content/uploads/2012/12/50-org.virtman-libvirt-local-access.pkla
Voila! you are finished! You can test the results by simply starting virt-manager from your applications menu or the command line and it should no longer prompt for password for anyone that is a member of the virtman group!
Bash Navigating Shortcuts
Here are few great shortcuts that will make navigating in BASH a bit easier. This also works in many other shells, as I am often in Korn Shell in our AIX and HP-UX machines.
I learned a few shortcuts a while ago from this website, as well as this one.
These were taking from the “Command Line Editing” in the bash manual. The bash manual is a well-written piece of documentation. It would do all SysAdmins well to read this manual a few times.
Well, here’s the new shortcuts I learned:
Basic moves
- Move back one character.
Ctrl+b - Move forward one character.
Ctrl+f - Delete current character.
Ctrl+d - Delete previous character.
Backspace - Undo.
Ctrl+-
Moving faster
- Move to the start of line.
Ctrl+a - Move to the end of line.
Ctrl+e - Move forward a word.
Meta+f(a word contains alphabets and digits, no symbols) - Move backward a word.
Meta+b - Clear the screen.
Ctrl+l
What is Meta? Meta is your Alt key, normally. For Mac OSX user, you need to enable it yourself. Open Terminal > Preferences > Settings > Keyboard, and enable Use option as meta key. Meta key, by convention, is used for operations on word.
Cut and paste (‘Kill and yank’ for old schoolers)
- Cut from cursor to the end of line.
Ctrl+k - Cut from cursor to the end of word.
Meta+d - Cut from cursor to the start of word.
Meta+Backspace - Cut from cursor to previous whitespace.
Ctrl+w - Paste the last cut text.
Ctrl+y - Loop through and paste previously cut text.
Meta+y(use it afterCtrl+y) - Loop through and paste the last argument of previous commands.
Meta+.
Search the command history
- Search as you type.
Ctrl+rand type the search term; RepeatCtrl+rto loop through results. - Search the last remembered search term.
Ctrl+rtwice. - End the search at current history entry.
Ctrl+j - Cancel the search and restore original line.
Ctrl+
CodeWeavers Flock The Vote is Live!
CodeWeavers has again launched a Presidential Election Year promotion! This is similar to the Lame Duck promotion that many of you may remember from 2008. This is the campaign that made me aware of CodeWeavers and Crossover, and has since helped me run all kinds of Windows software on my Linux workstations.
I have been a very happy customer of CodeWeavers since 2008, and now I am happy to help them spread the word on this new campaign. Heres the details:
If 100,000 people signup as "pledging to vote" in this years Presedential Election campaign, they will launch a 24 hour give-a-way of their Crossover software for Mac and Linux! All you have to do is enter your email address saying that you will be voting in this years election, and thats it! Once they hit 100,000 people signed up, they will announce when they will be doing the 24 hour give-a-way.
Click on the logo below to be taken to the "Flock The Vote" campaign!
![]()
iptables Tutorial and Exmaples
This is a small manual of iptables, I’ll show some basic commands, you may need to know to keep your computer secure.
Basic commands
List rules
iptables -LThis is going, list the default table “Filter”.
Edit: You may prefer to use iptables -L -vn to get more information, and to see ports as numbers instead of its names.
List rules in specific table
iptables -L -t natYou can also list the other tables like: mangle, raw and security. You should consider reading a bit more about tables. You can do it in the Tables section in the man page of iptables
Delete all rules
iptables -FDelete specific table liket nat
iptables -t nat -FSpecify chain policies
iptables let’s you configure default policies for chains in the filter table, where INPUT, FORWARD and OUTPUT, are the main ones (or at least the most used). Users can even define new chains.
These aforementioned chains, are better explained in this graph that comes from Wikipedia.
 You can see the original image here
iptables -P INPUT DROP iptables -P FORWARD ACCEPT iptables -P OUTPUT DROPYou can define the default policy as ACCEPT and then deny specific traffic, or define default policies as DROP and then open specific traffic to and/or from your box. The last one is more secure, but require more job.
Block IP traffic from an specific IP or Network.
Block from an IP
iptables -A INPUT -s 11.22.33.44 -j DROPIf you want to block only on an specific NIC
iptables -A INPUT -s 11.22.33.44 -i eth0 -j DROPOr an specific port
iptables -A INPUT -s 11.22.33.44 -p tcp -dport 22 -j DROPUsing a Network and not only one IP
iptables -A INPUT -s 11.22.33.0/24 -j DROPBlock traffic from a specific MAC address
Suppose you want to bloc traffic some a MAC address instead of an IP address. This is handy if a DHCP server is changing the IP of the maching you want to protect from.
iptables -A INPUT -m mac --mac-source 00:11:2f:8f:f8:f8 -j DROPBlock a specific port
If all you want is to block a port, iptables can still do it.
And you can block incoming or outgoing traffic.
Block incoming traffic to a port
Suppose we need to block port 21 for incoming traffic:
iptables -A INPUT -p tcp --destination-port 21 -j DROPBut if you have two-NIC server, with one NIC facing the Internet and the other facing your local private Network, and you only one to block FTP access from outside world.
iptables -A INPUT -p tcp -i eth1 -p tcp --destination-port 21 -j DROPIn this case I’m assuming eth1 is the one facing the Internet.
You can also block a port from a specific IP address:
iptables -A INPUT -p tcp -s 22.33.44.55 --destination-port 21 -j DROPOr even block access to a port from everywhere but a specific IP range.
iptables -A INPUT p tcp -s ! 22.33.44.0/24 --destination-port 21 -j DROPBlock outgoing traffic to a port
If you want to forbid outgoing traffic to port 25, this is useful, in the case you are running a Linux firewall for your office, and you want to stop virus from sending emails.
iptables -A FORWARD -p tcp --dport 25 -j DROPI’m using FORWARD, as in this example the server is a firewall, but you can use OUTPUT too, to block also server self traffic.
Log traffic, before taking action
If you want to log the traffic before blocking it, for example, there is a rule in an office, where all employees have been said not to log into a given server, and you want to be sure everybody obeys the rule by blocking access to ssh port. But, at the same time you want to find the one who tried it.
iptables -A INPUT -p tcp --dport 22 -j LOG --log-prefix "dropped access to port 22" iptables -A INPUT -p tcp --dport 22 -j DROPYou will be able to see which IP tried to access the server, but of course he couldn’t.
Tips and Tricks
Because iptables executes the rules in order, if you want to change something you need to insert the rule in the specific position, or the desired effect is not going to be achieved.
List rules with numbers
iptables -nL --line-numbersThis is going to list all your rules with numbers preceding the rules. Determine where you want the inserted rule and write:
List specific chains
iptables -nL INPUTWill list all INPUT rules.
iptables -nL FORWARDWill list all OUTPUT rules
Insert rules
iptables -I INPUT 3 -s 10.0.0.0/8 -j ACCEPTThat is going to add a rule in position 3 of the “array”
Delete rules
iptables -D INPUT 3That is going to remove the rule inserted above. You can also remove it, by matching it.
iptables -D INPUT -s 10.0.0.0/8 -j ACCEPTDelete flush all rules and chains
This steps are very handy if you want to start with a completely empty and default tables:
iptables --flush iptables --table nat --flush iptables --table mangle --flush iptables --delete-chain iptables --table nat --delete-chain iptables --table mangle --delete-chainNOTE: do not execute this rules if you are connected via ssh or something similar, you may get locked out
Simple scripts for specific needs
How to stop brute force attacks
You can also use iptables to stop brute force attacks to your server, for example: Allow only three attempts to log through ssh before banning the IP for 15 minutes, this should let legitimate users to log to the servers, but bots will not be able. Remember to always use strong passwords
iptables -F iptables -A INPUT -i lo -p all -j ACCEPT iptables -A OUTPUT -o lo -p all -j ACCEPT iptables -A INPUT -i eth0 -m state --state ESTABLISHED,RELATED -j ACCEPT iptables -A INPUT -p tcp --dport ssh -j ACCEPT iptables -A INPUT -p tcp --dport www -j ACCEPT iptables -I INPUT -p tcp --dport 22 -i eth0 -m state --state NEW -m recent --set iptables -I INPUT -p tcp --dport 22 -i eth0 -m state --state NEW -m recent --update --seconds 900 --hitcount 3 -j DROP iptables -P INPUT DROPHow to NAT with iptables
iptables is also very useful to configure NAT routers, a Linux mashing can act as a router, and share its public IP with a private networks behind it. It is also useful to configure the DHCP in the same server.
To configure a NAT router, you will be better with a server with two NICs, let’s suppose you have:
- eth0: 12.13.14.15
- eth1: 10.1.1.1
Now configure NAT to forward all traffic from 10.1.1.0 network through eth0 IP. You may want to empty all tables and start with a fresh chains and tables (see how above).
iptables --table nat --append POSTROUTING --out-interface eth0 -j MASQUERADE iptables --append FORWARD --in-interface eth1 -j ACCEPTThat is it, you only have to enable kernel forwarding now:
echo 1 > /proc/sys/net/ipv4/ip_forwardResize a LUKS Encryped LVM Partition
I recently had to resize the partition we use on our secure FTP server. Luckily, we use LVM on all our machines, so this was a simple task. My only concern was that it was a LUKS encrypted partition, I was afraid I would loose data due to the encryption algorithms and keys changing based upon the new size. After searching around, Here are the steps I came up with to resize a LUKS partition without loosing any data:
Assumptions and beginning info:
We have a LUKS filesystem named "encrypted" that is on alogical volume named "encrypted_LV"
The "encypted_LV" belongs to a volume group named "root_VG"
We are mounting this filesystem at /secret
We are using ext3 as the underlying filesystem
We want to extend the volume by adding 20 Gig from our root_VG volume group (It was already available as free space).
1. Unmount the filesystem:
umount /secret
2. Run a filesystem check to clean up the inode tables before working with it:
fsck.ext3 -C 0 -f /dev/mapper/encrypted
3. Close out the LUKS filesystem:
cryptsetup luksClose encrypted
4. Extend the Logical Volume like you would any other LVM (We are adding additional 20G of space):
lvextend -L +20G /dev/root_VG/encrypted_LV
5. Re-open the encrypted filesystem and resize it:
cryptsetup luksOpen /dev/root_VG/encrypted_LV encrypted

cryptsetup --verbose resize myfs
6. FSCK again (for good measure) and then resize the underlying filesystem (ext3 in this example):
fsck.ext3 -f /dev/mapper/encrypted

resize2fs /dev/mapper/encrypted
7. Mount up the newly sized LUKS filesystem and make sure everything is OK:
mount /dev/mapper/encrypted /secret
Add, Remove, and adjust disks and file systems in AIX 6.1
You can use the built in tool called SMITTY to resize files systems in AIX. Supply SMITTY with the FS argument to work with the file systems. See instructions below for a walk through of adjusting /opt
Launch Smitty by typing: smitty fs

Arrow down to the third option "Add / Change / Show / Delete File Systems" and press enter.

Select "Enhanced Journaled File System" and press enter.

Arrow down to the third option labled "Change / Show Characteristics of an Enhanced Journaled File System" and press enter.

This will bring up a selection box of the available partitions and file systems that can be edited. Use the arrow keys to select the one you want to modify, and press enter.

Now you will see all available options for editing. To adjust the size of the file system, arrow down to the line labeled "Number of Units"
In this example, I have adjusted the file system to 12582912 units which is equivalent to 6 GB.
Once you have entered the desired size, press the enter key to accept.

Give the system a few seconds to adjust the size, and if successful you will see a message similar to the one below.

Once you see this confirmation, press the F10 to exit smitty.